Description:
Crispy Baked Chimichangas are golden, crunchy, and packed with flavorful filling—an easy, healthier Mexican-inspired dinner everyone will love!
Introduction
If you love restaurant-style chimichangas but want a lighter, healthier version you can make at home, these Crispy Baked Chimichangas are about to become your new favorite dinner. They have everything you crave—crispy golden tortillas, a warm savory filling, melty cheese, and bold Tex-Mex flavor—without the mess or extra oil of deep frying.
This easy baked chimichanga recipe delivers all the crunch and comfort of the classic dish while keeping things lighter and more wholesome. Perfect for busy weeknights, family dinners, meal prep, or game day gatherings, these baked chimichangas come together quickly and disappear even faster.
Whether you fill them with seasoned chicken, beef, or beans, they bake up beautifully crisp in the oven with a satisfying crunch in every bite. Plus, they’re easy to customize for low-carb or keto-inspired variations if needed.
If you’ve been looking for a healthy, easy recipe that tastes indulgent but fits into a balanced lifestyle, this is it. One bite of these crunchy, cheesy chimichangas and you’ll wonder why you ever fried them in the first place!
Recipe Stat Sheet
| Recipe Detail | Information |
|---|---|
| Recipe Name | Crispy Baked Chimichangas |
| Prep Time | 20 Minutes |
| Cook Time | 25 Minutes |
| Total Time | 45 Minutes |
| Servings | 6 Chimichangas |
| Difficulty | Easy |
| Cuisine | Mexican / Tex-Mex |
| Calories | 390 Per Serving |
Recipe Equipment
To make the perfect Crispy Baked Chimichangas, you’ll need:
- Large skillet
- Mixing spoon or spatula
- Baking sheet
- Parchment paper or nonstick spray
- Pastry brush
- Measuring cups and spoons
- Knife and cutting board
Ingredients
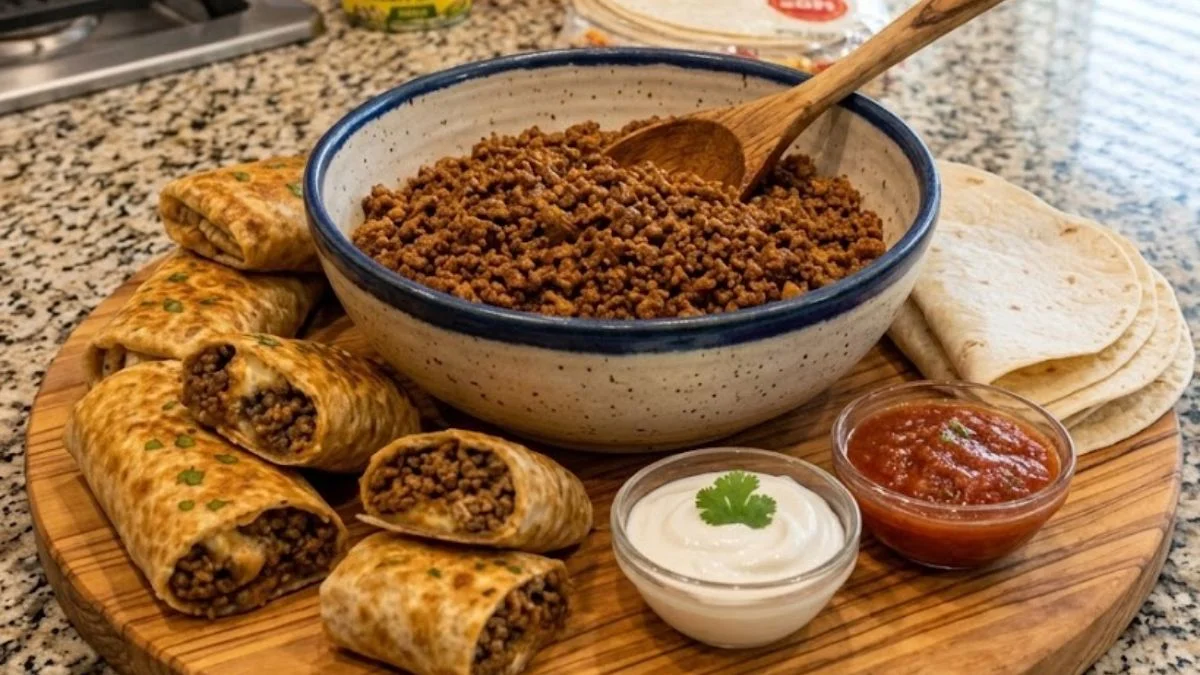
- 2 cups cooked shredded chicken or ground beef
- 1 tablespoon olive oil
- 1/2 cup diced onion
- 2 cloves garlic, minced
- 1 cup salsa
- 1 teaspoon chili powder
- 1 teaspoon cumin
- 1/2 teaspoon paprika
- Salt and pepper to taste
- 1 1/2 cups shredded cheddar or Mexican blend cheese
- 6 large flour tortillas
- 2 tablespoons melted butter or olive oil (for brushing)
- Optional toppings: sour cream, guacamole, salsa, cilantro
Ingredient Notes
Table of Contents
Protein Choice
Shredded rotisserie chicken works wonderfully for convenience, but seasoned ground beef or turkey also makes a delicious filling.
Cheese
Use freshly shredded cheese for the best melt and creaminess. Pre-shredded cheese contains anti-caking agents that can affect texture.
Salsa
Choose your favorite chunky salsa for bold flavor. Mild, medium, or spicy all work depending on your heat preference.
Tortillas
Large burrito-size flour tortillas are ideal because they fold easily and hold the filling without tearing.
Why These Ingredients Work
This combination creates the perfect chimichanga filling—savory protein, melty cheese, aromatic spices, and salsa for moisture and bold Tex-Mex flavor. Brushing the tortillas with butter or oil before baking helps them crisp beautifully in the oven for that classic fried-style crunch.
Step-by-Step Instructions
Step 1: Prepare the Filling
Heat olive oil in a large skillet over medium heat. Add diced onion and cook until soft and translucent, about 3–4 minutes. Stir in garlic and cook for another 30 seconds until fragrant.
Add shredded chicken or ground beef to the skillet along with salsa, chili powder, cumin, paprika, salt, and pepper. Stir everything together until fully combined and heated through.
Remove from heat and let cool slightly.
Step 2: Add Cheese
Stir 1 cup of shredded cheese into the warm filling mixture. The residual heat will melt the cheese slightly, creating a creamy, gooey filling that holds together beautifully.
Step 3: Fill the Tortillas
Lay tortillas flat on a clean surface. Spoon about 1/2 cup of filling into the center of each tortilla.
Fold in the sides, then roll tightly like a burrito to secure the filling.
Step 4: Prep for Baking
Preheat oven to 400°F.
Line a baking sheet with parchment paper or spray with nonstick spray.
Place chimichangas seam-side down on the baking sheet. Brush tops and sides generously with melted butter or olive oil.
Step 5: Bake Until Crispy
Bake for 20–25 minutes, flipping halfway through if desired, until the chimichangas are deeply golden, crispy, and beautifully browned.
The outside should be crunchy and crisp while the inside stays warm, cheesy, and flavorful.
Step 6: Serve and Enjoy
Let cool for 5 minutes before serving.
Top with sour cream, guacamole, salsa, chopped cilantro, or fresh jalapeños for the ultimate restaurant-style experience.
Serving Suggestions
These Crispy Baked Chimichangas pair perfectly with:
- Mexican rice or cilantro lime rice
- Refried or black beans
- Fresh avocado salad
- Corn salsa
- Tortilla chips and queso
- A side of guacamole and pico de gallo
They’re also fantastic sliced in half and served as party appetizers!
Pro Tips & Variations
For extra crispy chimichangas, bake them on a wire rack placed over the baking sheet so air circulates all around. Want more heat? Add diced jalapeños or hot sauce to the filling. For a vegetarian option, replace the meat with black beans and sautéed peppers. You can also use whole wheat or low-carb tortillas for a healthier twist.
Meal prepping? Assemble the chimichangas ahead of time and refrigerate until ready to bake. Leftovers reheat beautifully in the oven or air fryer for a crisp finish.
Storage Information
Refrigerator
Store leftover chimichangas in an airtight container for up to 4 days.
Freezer
Wrap individually in foil or plastic wrap and freeze for up to 2 months.
Reheating
Reheat in the oven at 375°F for 10–15 minutes or air fry until crispy. Avoid microwaving if possible to preserve crunch.
Nutrition Facts (Per Serving – Estimated)
- Calories: 390
- Protein: 26g
- Fat: 18g
- Carbohydrates: 28g
- Fiber: 3g
- Sugar: 4g
These Crispy Baked Chimichangas prove you don’t need a deep fryer to enjoy bold, crunchy, comfort-food goodness at home. They’re cheesy, crispy, flavorful, and incredibly easy to make—everything you want in a weeknight dinner or party dish.
Give this recipe a try and let us know how it turned out! Did you use chicken, beef, or make your own fun variation? Drop a comment below and share your delicious creation with friends and family. 🌮✨